BLOGS
Flutter Push Notifications: iOS, Android, Web (Part 2: iOS)
Learn how to implement push notifications in your Flutter iOS app using NotificationAPI and Apple Push Notification service (APNs). Practical, step-by-step guide based on a real device walkthrough.

Important Links:
- GitHub for this tutorial
- A more complex example
- NotificationAPI Flutter SDK
- NotificationAPI Flutter SDK Documentation
YouTube Walkthrough
In this tutorial (Part 2 of our Flutter Push Notifications series), you’ll learn how to implement push notifications in your Flutter iOS application using NotificationAPI and Apple Push Notification service (APNs). This guide is iOS-specific and complements our Android tutorial.
Why Push Notifications Are Complex (And How We’ll Simplify Them)
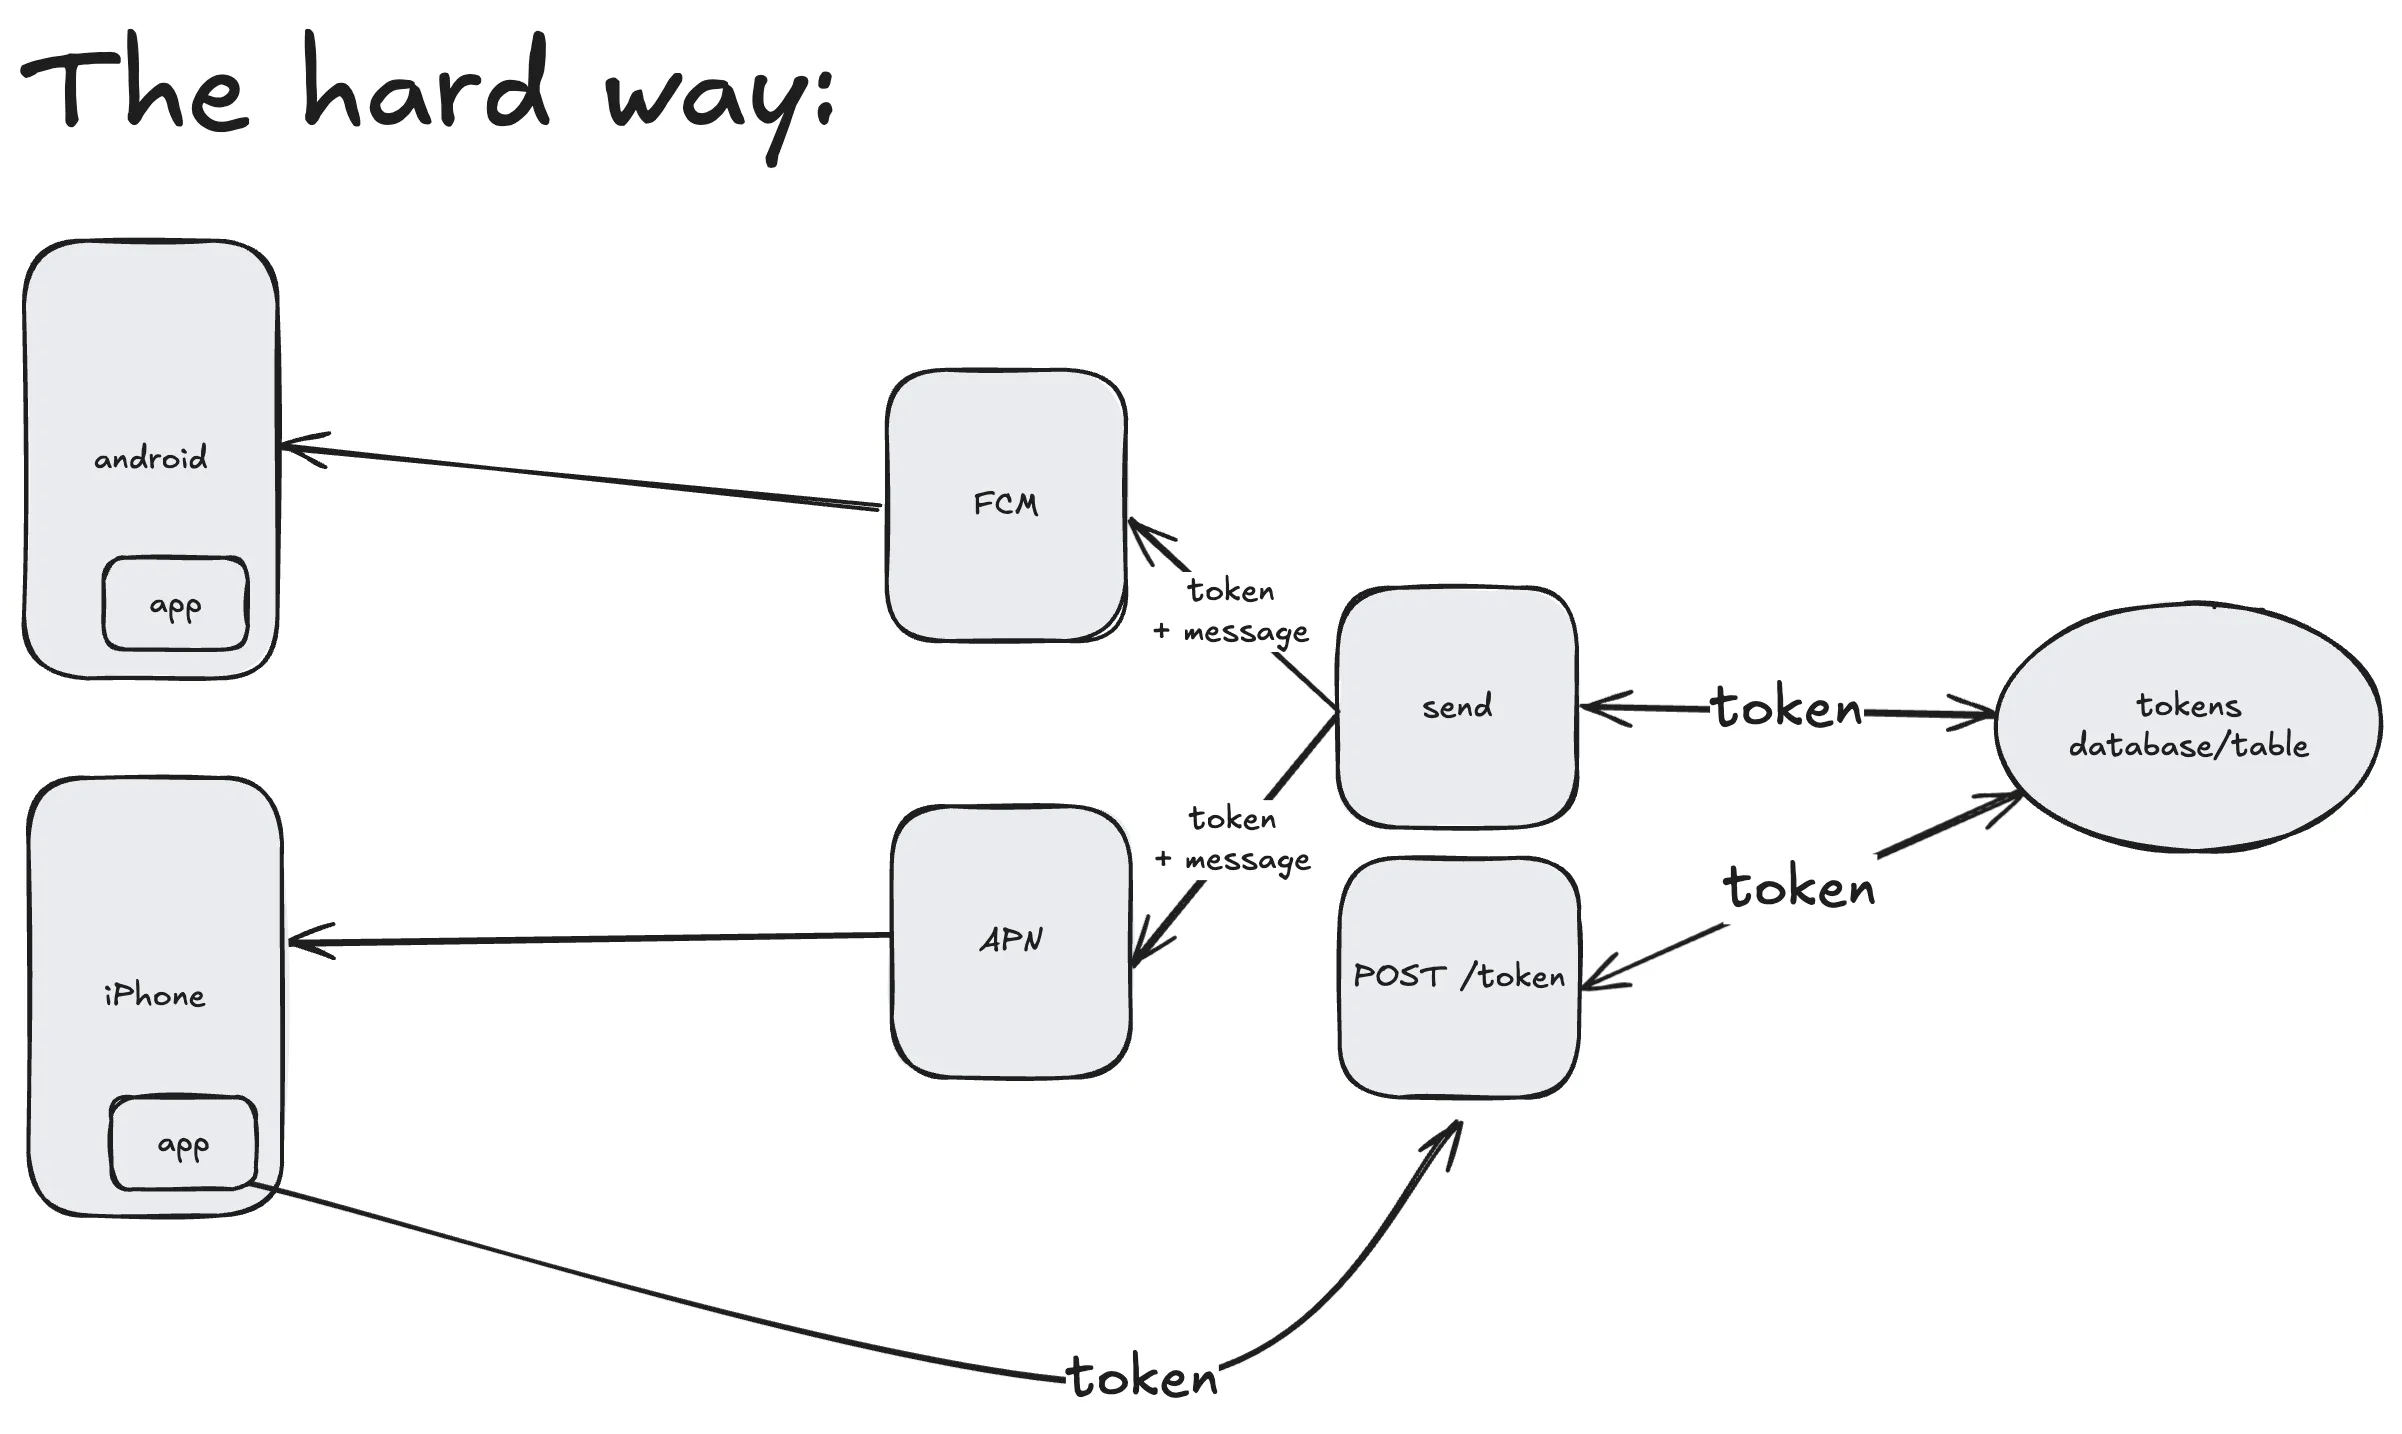
Push notifications are notoriously difficult to implement. Here’s why:
- Monopoly Control: Only Apple (APNs) can send notifications to iOS devices, and only Google (FCM) can send to Android devices
- Complex Token Management: Each device generates a unique push token that must be stored and managed on your servers
- Multi-step Process: Requesting permissions → generating tokens → storing tokens → retrieving tokens → sending notifications
This typically requires building a complete backend infrastructure just to send a “Hello World” notification. But we have a much simpler approach.
Why Use NotificationAPI for Flutter Push Notifications?

NotificationAPI reduces the complex 5–6 step process into just 3 simple steps:
- Create an APNs key (in your Apple Developer account)
- Connect NotificationAPI to APNs (paste your key details in our dashboard)
- Install our SDK and start sending notifications by user ID
All the complex permission handling, token generation/refresh, and secure storage happen automatically under the hood.
Prerequisites for iOS
Before you start, note the following platform requirements:
- A real iPhone (push notifications do not work on the iOS Simulator)
- A paid Apple Developer account (required to enable Push Notifications capability and create APNs keys)
Step 1: NotificationAPI Account
- Sign up at NotificationAPI (generous free tier)
- Create a new notification: “Hello World”
- Select Mobile Push as the notification type
- Open the Mobile Integration tab → Apple Push Notification (APNs)
You’ll see a form asking for:
- Key ID (from Apple Developer → Keys)
- Team ID (from your Apple Developer account)
- Topic (your app’s Bundle Identifier, e.g.,
com.example.flutter_ios_demo) - Key (key file contents) (paste the contents of the downloaded APNs Auth Key file)
Keep this page open — we’ll fill it out after creating the APNs key.
Step 2: Create an APNs Key in Apple Developer
In your Apple Developer account:
- Go to Certificates, Identifiers & Profiles → Keys
- Click + to create a new key
- Name it (e.g.,
NotificationAPI) - Enable Apple Push Notifications service (APNs)
- Prefer selecting both Sandbox and Production (one key works for both)
- Click Continue → Register → Download the key file (
AuthKey_XXXXXX.p8)
Important:
- You can only download this key file once. Keep it safe and never commit it to version control.
- Note down the Key ID shown on this page.
- Your Team ID is available in your account header/profile.
Connect APNs to NotificationAPI
Return to the NotificationAPI dashboard’s APNs form and fill in:
- Key ID: from the Apple Keys page
- Team ID: from your Apple Developer account
- Topic: your app’s Bundle Identifier (e.g.,
com.example.flutter_ios_demo) - Key: paste the entire contents of your downloaded key file
Save the configuration. NotificationAPI can now send push notifications through your APNs credentials.
Step 3: Integrate the Flutter SDK
Add the NotificationAPI Flutter SDK to your project:
flutter pub add notificationapi_flutter_sdkInitialize the SDK in your app after the user is identified/logged in:
import 'package:flutter/material.dart';
import 'package:notificationapi_flutter_sdk/notificationapi_flutter_sdk.dart';

class _MyAppState extends State<MyApp> {
  @override
  void initState() {
    super.initState();
    NotificationAPI.setup(
      clientId: 'YOUR_CLIENT_ID',
      userId: 'user_a', // Replace with your app's unique user identifier
      // region: 'eu' | 'ca' // Only if your account is in EU/Canada
    );
  }

  // ... rest of your app
}
Notes:
- Client ID: Find it in NotificationAPI dashboard → Environments
- User ID: Use your own app’s durable user identifier
- Timing: Call
setup()after login/registration for better UX
Step 4: iOS Project Setup (Xcode)
Because iOS requires proper signing and capabilities, ensure the following in Xcode for the Runner target:
- Open the Flutter iOS project in Xcode (
ios/Runner.xcworkspace) - In
Runner→ Signing & Capabilities:- Select your Team (paid Apple Developer account)
- Set the Bundle Identifier (e.g.,
com.example.flutter_ios_demo) - Ensure Automatically manage signing is enabled (for development)
- Click + Capability and add Push Notifications
- Make sure the Bundle Identifier exactly matches the Topic you configured in NotificationAPI
Deploy to a real iPhone (Developer Mode enabled) via Xcode or flutter run. On first launch, iOS will prompt for notification permission — tap Allow.
Verify Device Registration
After the app runs with NotificationAPI.setup(...):
- Go to NotificationAPI Users page
- Search for the
userIdyou passed in the code - You should see Mobile Push marked as Enabled (token synced)
Send Your First Push Notification
Use the code samples in the NotificationAPI dashboard, or try cURL:
curl -X POST \
  -H "Content-Type: application/json" \
  -H "Authorization: Basic $(echo -n "YOUR_CLIENT_ID:YOUR_CLIENT_SECRET" | base64)" \
  -d '{
    "type": "hello_world_notification",
    "to": {
      "id": "user_a"
    },
    "mobile_push": {
      "title": "Hello from Flutter on iOS!",
      "message": "Your first iOS push notification is working!"
    }
  }' \
  "https://api.notificationapi.com/YOUR_CLIENT_ID/sender"
Troubleshooting common issues:
- Mismatched user ID: Ensure
to.idin the request matches theuserIdused in your app - No notification received: Verify the Bundle Identifier in Xcode matches the Topic in NotificationAPI’s APNs settings
- Simulator: iOS Simulator does not support push notifications — test on a real device
Security Best Practices
- Server-Side Only: Never put your NotificationAPI credentials or APNs keys in client-side code. Never commit them to version control.
- Token Management: Let NotificationAPI handle token refreshing and management automatically.
Tips for a Better UX
- Don’t call
setup()on the very first app open. Prompt for notifications after a user action or at a moment of understood value (e.g., after onboarding or profile completion).
Next Steps: Android and Web Support
This tutorial focused on iOS. For Android, see Part 1. A web-specific tutorial is coming soon.
Further Reading
Feedback and Support
Questions or feedback? Reach out at support@notificationapi.com or the website chat widget.